Let’s build a user-friendly gallery filter using HTML and CSS that enhances the browsing experience for visitors. This filtering tool will allow users to efficiently organize and view gallery items based on specific categories, making it significantly easier to navigate and locate desired content. By implementing this feature, users can quickly filter through the gallery, ensuring that they can focus on the items that are most relevant to their interests. This approach not only improves usability but also adds a level of interactivity that enriches the overall experience of your website.
We will begin by using HTML to establish the foundational structure of the gallery, ensuring that each element is properly organized and ready for styling. Then, we’ll apply CSS to not only enhance the visual appeal of the gallery but also to implement the filtering functionality that will allow users to easily sort and view gallery items based on their preferences.
Now, let’s dive into the process of creating the Gallery Filter UI Kit. This project is an excellent opportunity for both beginners and experienced developers to sharpen their web design skills and create a polished, user-friendly interface for displaying content. Whether you’re just starting your journey in web development or looking to refine your skills, this hands-on experience will guide you through the steps to build a sleek and functional gallery filter. So, let’s get started on crafting a dynamic and visually appealing gallery that will engage and delight your users!
HTML:
This HTML document is designed to create a dynamic gallery that features a filtering mechanism, all accomplished through the use of the UIkit framework. To enhance the gallery’s functionality and appearance, the document includes links to external CSS and JavaScript files, which are used for loading custom fonts and various UIkit components.
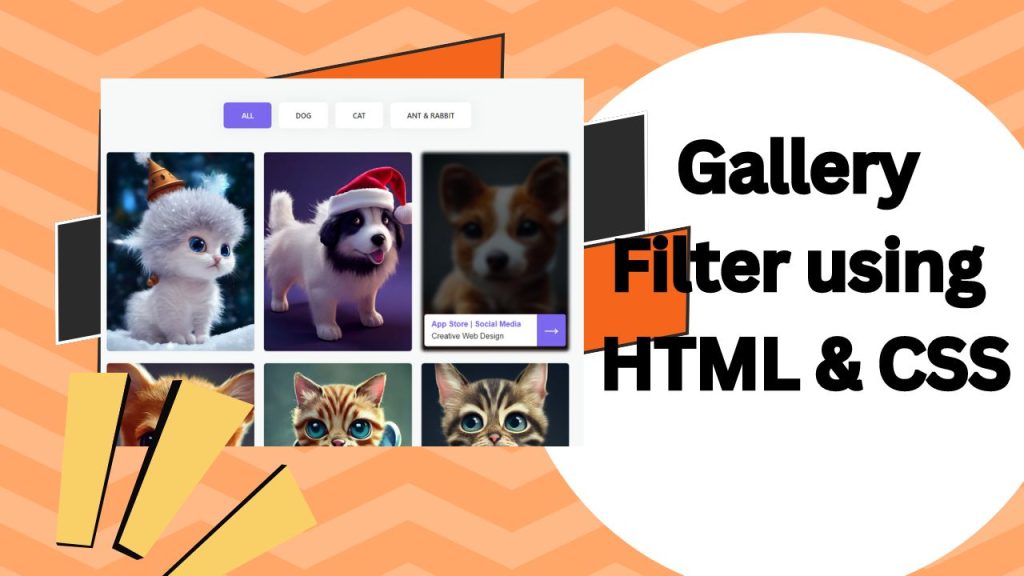
The gallery itself is structured with a navigation bar that provides users with several filtering options: “All,” “DOG,” “CAT,” and “ANT & RABBIT.” These options allow users to easily sort and view the content based on specific categories. Each item within the gallery is constructed as a list element, which contains a visually appealing image, a piece of descriptive text, and an interactive button that enhances user engagement.
The images within the gallery are organized and classified using a data-num attribute, which plays a crucial role in the filtering process. When a user clicks on one of the filter options in the navigation bar, the gallery dynamically updates to display only the images that match the selected category, providing a seamless and intuitive user experience.
The UIkit framework is responsible for handling the complex aspects of the gallery, such as the filtering mechanism and the grid layout. This ensures that the gallery is not only functional but also visually consistent and responsive across different devices and screen sizes. Through the combination of HTML, CSS, and the powerful features of UIkit, this document delivers a polished and user-friendly gallery interface.
CSS :
This CSS code is crafted to style a webpage that incorporates a gallery with a filtering feature, ensuring both aesthetic appeal and functionality. The overall design begins with setting the background color of the page to a soft, light grey, providing a neutral and soothing backdrop that enhances the visibility of the gallery elements. The main content of the page is meticulously centered, and additional padding is applied to create balanced spacing around the content, giving the page a clean and organized appearance.
The navigation bar, which plays a crucial role in the filtering functionality, is also centered on the page, contributing to the symmetrical layout. It uses the “Catamaran” font, chosen for its modern and clean lines, which adds a touch of sophistication to the navigation elements. The buttons within the navigation bar are styled to resemble box-like elements with subtle shadow effects, creating a sense of depth and elevating their prominence on the page. These buttons are designed to change color when hovered over, providing a clear visual cue to users that they are interactive, which enhances the user experience.
Within the content box, there are additional interactive elements, including a highlighted span and a link. These elements are animated to fade into view with a slight delay when the page is loaded or when they come into focus. This animation adds a dynamic quality to the gallery, making it more engaging for users. The smooth transitions and responsive design features ensure that the gallery not only looks good but also functions seamlessly across various devices and screen sizes.
Overall, these styling decisions combine to create a gallery that is not only visually appealing but also highly interactive, with a focus on user experience through smooth animations and responsive design elements. The result is a polished and professional-looking webpage that effectively showcases content in an organized and attractive manner.
Conclusion:
In summary, undertaking the development of a Gallery Filter UI Kit using HTML and CSS has proven to be an immensely valuable endeavor for advancing web design skills. By leveraging HTML to establish the foundational structure of the gallery and employing CSS to refine its visual presentation, we have successfully built an interactive and meticulously organized framework for displaying and filtering various types of content.
This project not only enhances technical proficiency in web design but also demonstrates how to create a user-friendly interface that efficiently manages and showcases images or other items. The result is a visually compelling and accessible gallery that allows users to seamlessly navigate through and interact with the content. This approach ensures that the presentation is both engaging and aesthetically pleasing, making it a superb choice for any application requiring a polished and functional display of visual elements.
Frequently Asked Questions
How to add filter with portfolio gallery using HTML, CSS, and JavaScript?
How to create splash screen using HTML and CSS?
How to create a personal portfolio website using HTML and CSS code?
Creating a personal portfolio website using HTML and CSS is a great way to showcase your skills, projects, and experience
How do I embed a photo gallery in HTML?
Embedding a photo gallery in HTML is a straightforward process. You can create a basic gallery by using a combination of HTML and CSS to display images in a grid or other layouts.
How do I create an automatic pop up window in HTML and CSS?
To create an automatic pop-up window in HTML and CSS, you typically need to combine these with JavaScript. JavaScript is used to control the timing of the pop-up and to trigger it automatically when the page loads or after a certain delay
How to display image using HTML and CSS?
The HTML <img> tag is employed to render images on a web page. Instead of embedding images directly within the page’s content, the <img> tag references an external image file through a link. This means that the actual image is not part of the HTML code itself but is located at a specified URL or file path. The <img> tag functions as a placeholder or container for this external image, allowing it to be displayed on the page. As a self-contained or empty element, the <img> tag includes only attributes to define its properties and does not have a corresponding closing tag. This design enables the <img> tag to integrate images into web content efficiently while maintaining a clean and straightforward HTML structure.
How to make Android app using HTML CSS?
Developing an Android app using HTML and CSS involves a multi-step process, as you’ll need to leverage a framework that enables you to convert web technologies into a native mobile application. This approach is particularly useful for those who are familiar with web development but wish to create a mobile app without delving deeply into native programming languages. Here’s a detailed step-by-step guide to walk you through the entire process:
How do I add a photo gallery to a website?
To begin, select either “Edit Website” or “Edit Site” from the available options. Proceed to the specific page and exact location where you intend to add a photo gallery. Once you are on the correct page, initiate the process of adding a new section. To do this, search for the term “Photo Gallery,” which is listed under the broader category of Image Gallery. After locating the Photo Gallery option, choose the “Add” button corresponding to the layout that best suits your needs. If you find that you need to make adjustments or switch to a different layout later on, you can easily modify your selection at any time.
How to put images in HTML CSS?
To integrate images into a webpage, we use the <img> inline element. The <img> tag is categorized as an empty or self-closing element, which means it does not contain or wrap around any other content; it stands alone as a single, self-contained tag. This characteristic makes it different from other HTML elements that usually encompass nested content.
For the <img> element to function correctly and display an image, it is crucial to include the src attribute, which specifies the URL or path where the image file is located. This src attribute and its associated value provide the necessary reference for the browser to locate and render the image on the page. Without this attribute, the <img> element would not be able to display any visual content, as it would lack the required source information.