Coding classic

html, css, javascript, react, python

Creating a Functional Weather App with HTML, CSS, and JavaScript :From Scratch

Let’s create a cool weather app together! We’ll use HTML to build the app’s structure, CSS to style it nicely, and JavaScript to make it interactive. No complicated stuff, just simple coding to get accurate weather information.

Building a weather app is a fantastic way to apply your HTML, CSS, and JavaScript skills to a real-world project. It’s a project that combines design, functionality, and data fetching, making it a comprehensive learning experience.

In this tutorial, we’ll guide you through the process of creating a basic weather app from scratch. We’ll start with the fundamental HTML structure, then enhance its appearance using CSS, and finally bring it to life with JavaScript to fetch and display weather data.

1. Project Setup and HTML Structure

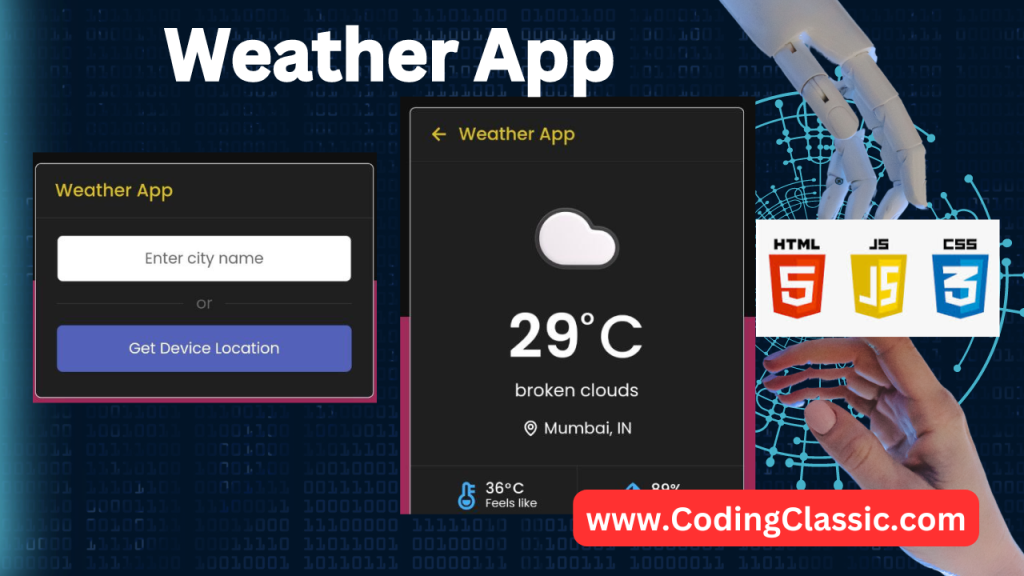
This HTML document establishes the layout for a weather application, featuring distinct sections for user interaction, weather information, and supplementary details. The input area enables users to either enter a city name or utilize their device’s location services. The weather display section is designed to showcase various weather metrics, including temperature, conditions, location, perceived temperature, and humidity levels. The accompanying JavaScript file is expected to manage the retrieval and presentation of weather data, bringing the interface to life.

Here’s a breakdown of the HTML code with comments explaining each section:

<!DOCTYPE html>
<html lang="en">
<head>
  <!-- Defines the character encoding for the document -->
  <meta charset="UTF-8">
  
  <!-- The title of the webpage that appears in the browser tab -->
  <title>Weather App using JS</title>
  
  <!-- Link to an external icon library (Boxicons) for using icons in the app -->
  <link rel='stylesheet' href='https://unpkg.com/boxicons@2.0.9/css/boxicons.min.css'>
  
  <!-- Link to the external CSS file for styling the webpage -->
  <link rel="stylesheet" href="./style.css">
</head>
<body>
<!-- Main wrapper that contains the entire weather app UI -->
<div class="wrapper">
  
  <!-- Header section with a back arrow icon and the title "Weather App" -->
  <header>
    <i class='bx bx-left-arrow-alt'></i> <!-- Back arrow icon from Boxicons -->
    Weather App
  </header>
  
  <!-- Section for inputting the city name and getting the device's location -->
  <section class="input-part">
    <p class="info-txt"></p> <!-- Placeholder for displaying information or error messages -->
    
    <div class="content">
      <!-- Input field for entering the city name -->
      <input type="text" spellcheck="false" placeholder="Enter city name" required>
      
      <!-- A separator line between the input field and the button -->
      <div class="separator"></div>
      
      <!-- Button for getting the user's device location -->
      <button>Get Device Location</button>
    </div>
  </section>
  
  <!-- Section that displays the weather information -->
  <section class="weather-part">
    <!-- Placeholder for the weather icon (e.g., sunny, cloudy) -->
    <img src="" alt="Weather Icon">
    
    <!-- Display for the temperature -->
    <div class="temp">
      <span class="numb">_</span> <!-- Placeholder for the numeric temperature value -->
      <span class="deg">°</span>C <!-- Degree symbol followed by "C" for Celsius -->
    </div>
    
    <!-- Display for the weather condition (e.g., "Sunny", "Cloudy") -->
    <div class="weather">_ _</div>
    
    <!-- Display for the location (city and country) -->
    <div class="location">
      <i class='bx bx-map'></i> <!-- Map icon from Boxicons -->
      <span>_, _</span> <!-- Placeholder for the city and country names -->
    </div>
    
    <!-- Bottom section that provides additional weather details -->
    <div class="bottom-details">
      
      <!-- Column for displaying the "Feels like" temperature -->
      <div class="column feels">
        <i class='bx bxs-thermometer'></i> <!-- Thermometer icon from Boxicons -->
        
        <div class="details">
          <div class="temp">
            <span class="numb-2">_</span> <!-- Placeholder for the "Feels like" temperature value -->
            <span class="deg">°</span>C <!-- Degree symbol followed by "C" for Celsius -->
          </div>
          <p>Feels like</p> <!-- Label for the "Feels like" temperature -->
        </div>
      </div>
      
      <!-- Column for displaying the humidity level -->
      <div class="column humidity">
        <i class='bx bxs-droplet-half'></i> <!-- Droplet icon from Boxicons -->
        
        <div class="details">
          <span>_</span> <!-- Placeholder for the humidity percentage -->
          <p>Humidity</p> <!-- Label for the humidity level -->
        </div>
      </div>
    </div>
  </section>
</div>

<!-- Link to the external JavaScript file that contains the logic for the weather app -->
<script src="./script.js"></script>

</body>
</html>

2. CSS Styling: Enhancing the Look

This CSS code governs the visual appearance of a web page, specifying typography, background, color schemes, and layout configurations for diverse elements. It encompasses styling for input fields, buttons, weather displays, and other components, leveraging flexbox for layout management. Additionally, the code incorporates various aesthetic effects, such as box shadows and transitions, to enhance the overall user experience.

/* Import the "Poppins" font from Google Fonts with different weights (400, 500, 600, 700). */
@import url("https://fonts.googleapis.com/css2?family=Poppins:wght@400;500;600;700&display=swap");

/* Apply global styles to all elements. */
* {
  margin: 0; /* Remove default margin from all elements. */
  padding: 0; /* Remove default padding from all elements. */
  box-sizing: border-box; /* Include padding and border in element's total width and height. */
  font-family: "Poppins", sans-serif; /* Use the "Poppins" font for all text elements. */
}

/* Apply styles to the body element. */
body {
  display: flex; /* Enable flexbox layout to center content. */
  align-items: center; /* Vertically center content within the body. */
  justify-content: center; /* Horizontally center content within the body. */
  min-height: 100vh; /* Ensure the body takes at least the full height of the viewport. */
  background: linear-gradient(180deg, #0f0f0f 50%, #a12a59 50%); /* Apply a vertical gradient background. */
  color: #fff; /* Set the text color to white. */
}

/* Style the selected text. */
::selection {
  color: #141414; /* Set the text color to dark gray when selected. */
  background: #fff; /* Set the background color to white when text is selected. */
}

/* Main container for the form elements. */
.wrapper {
  width: 400px; /* Set a fixed width for the wrapper. */
  background: #1f1f1f; /* Set the background color to dark gray. */
  border-radius: 7px; /* Round the corners of the wrapper. */
  border: 1px solid #fff; /* Add a white border around the wrapper. */
  box-shadow: 7px 7px 20px rgba(0, 0, 0, 0.05); /* Add a subtle shadow to the wrapper. */
}

/* Style the header inside the wrapper. */
.wrapper header {
  display: flex; /* Enable flexbox layout. */
  font-size: 21px; /* Set the font size for the header text. */
  font-weight: 500; /* Apply a medium font weight. */
  color: #dbc025; /* Set the text color to a goldish yellow. */
  padding: 16px 15px; /* Add padding inside the header. */
  align-items: center; /* Center items vertically within the header. */
  border-bottom: 1px solid #333; /* Add a bottom border to separate the header from content. */
}

/* Style the icon inside the header. */
header i {
  font-size: 0em; /* Initially hide the icon by setting its font size to zero. */
  cursor: pointer; /* Change the cursor to a pointer when hovering over the icon. */
  margin-right: 8px; /* Add space to the right of the icon. */
}

/* When the wrapper has the 'active' class, apply these styles to the icon in the header. */
.wrapper.active header i {
  margin-left: 5px; /* Add space to the left of the icon. */
  font-size: 30px; /* Increase the font size to make the icon visible. */
}

/* Container for the input fields. */
.wrapper .input-part {
  margin: 20px 25px 30px; /* Add margins around the input section. */
}

/* When the wrapper has the 'active' class, hide the input part. */
.wrapper.active .input-part {
  display: none; /* Hide the input fields. */
}

/* Style the informational text (like error messages) in the input part. */
.input-part .info-txt {
  display: none; /* Initially hide the info text. */
  font-size: 17px; /* Set the font size for the info text. */
  text-align: center; /* Center the text horizontally. */
  padding: 12px 10px; /* Add padding inside the info text container. */
  border-radius: 7px; /* Round the corners of the info text container. */
  margin-bottom: 15px; /* Add space below the info text container. */
}

/* Style the error message within the info text. */
.input-part .info-txt.error {
  color: #ff5252; /* Set the text color to red for errors. */
  display: block; /* Display the error message block. */
  background: #1f1f1f; /* Set the background color to dark gray. */
  border: 1px solid #ff5252; /* Add a red border to the error message container. */
}

/* Style the pending message within the info text. */
.input-part .info-txt.pending {
  color: #5362b8; /* Set the text color to blue for pending messages. */
  display: block; /* Display the pending message block. */
  background: #1f1f1f; /* Set the background color to dark gray. */
  border: 1px solid #5362b8; /* Add a blue border to the pending message container. */
}

/* Apply styles to both input and button elements within the input part. */
.input-part :where(input, button) {
  width: 100%; /* Make the input/button elements take up the full width of the container. */
  height: 55px; /* Set a fixed height for the input/button elements. */
  border: none; /* Remove the default border. */
  outline: none; /* Remove the default outline. */
  font-size: 18px; /* Set the font size for the input/button text. */
  border-radius: 7px; /* Round the corners of the input/button elements. */
}

/* Specific styles for input fields. */
.input-part input {
  text-align: center; /* Center the text inside the input field. */
  padding: 0 15px; /* Add padding inside the input field. */
  border: 1px solid #333; /* Add a dark gray border to the input field. */
}

/* Apply styles to input fields when they are focused or have valid input. */
.input-part input:is(:focus, :valid) {
  border: 2px solid #dbc025; /* Change the border color to goldish yellow when focused or valid. */
}

/* Style the placeholder text inside input fields. */
.input-part input::placeholder {
  color: #666; /* Set the placeholder text color to light gray. */
}

/* Style the separator line within the input part. */
.input-part .separator {
  height: 1px; /* Set the height of the separator line. */
  width: 100%; /* Make the separator take up the full width of the container. */
  margin: 25px 0; /* Add vertical space around the separator. */
  background: #333; /* Set the separator color to dark gray. */
  position: relative; /* Position the separator relative to its container. */
  display: flex; /* Enable flexbox layout. */
  align-items: center; /* Center the content vertically within the separator. */
  justify-content: center; /* Center the content horizontally within the separator. */
}

/* Add text ("or") in the middle of the separator. */
.separator::before {
  content: "or"; /* Display the text "or" in the separator. */
  color: #666; /* Set the text color to light gray. */
  font-size: 19px; /* Set the font size for the text. */
  padding: 0 15px; /* Add padding around the text to separate it from the line. */
  background: #1f1f1f; /* Set the background color behind the text to dark gray. */
}

/* Style the button inside the input part. */
.input-part button {
  color: #fff; /* Set the button text color to white. */
  cursor: pointer; /* Change the cursor to a pointer when hovering over the button. */
  background: #5362b8; /* Set the button background color to blue. */
  transition: 0.3s ease; /* Add a transition effect for the background color change. */
}

/* Change the button background color when hovered over. */
.input-part button:hover {
  background: #525d9c; /* Darken the button background color when hovered. */
}

/* Style the weather part section within the wrapper. */
.wrapper .weather-part {
  display: none; /* Initially hide the weather part section. */
  margin: 30px 0 0; /* Add top margin to the weather part section. */
  align-items: center; /* Center the content vertically within the weather part section. */
  justify-content: center; /* Center the content horizontally within the weather part section. */
  flex-direction: column; /* Arrange the content in a column layout. */
}

/* When the wrapper has the 'active' class, display the weather part section. */
.wrapper.active .weather-part {
  display: flex; /* Show the weather part section. */
}

/* Style the image inside the weather part section. */
.weather-part img {
  max-width: 125px; /* Set a maximum width for the image. */
}

/* Style the temperature display within the weather part section. */
.weather-part .temp {
  display: flex; /* Enable flexbox layout for the temperature display. */
  font-weight: 500; /* Apply a medium font weight. */
  font-size: 72

3. JavaScript Functionality: Bringing it to Life

This JavaScript code powers a weather application that enables users to retrieve weather information by entering a city name or using their device’s geolocation. The code establishes event listeners for user input and geolocation button clicks, and defines functions to send API requests to OpenWeatherMap, retrieve data, and display weather information. It also includes logic to handle various weather conditions, updating the UI with relevant icons, temperature, weather descriptions, location, and humidity details. Furthermore, the code incorporates error handling and a reset feature, allowing users to revert to the initial state.

// Selecting DOM elements and storing them in variables
const wrapper = document.querySelector(".wrapper"), // Main wrapper element
  inputPart = document.querySelector(".input-part"), // Section for inputting city or getting location
  infoTxt = inputPart.querySelector(".info-txt"), // Element to display information or error messages
  inputField = inputPart.querySelector("input"), // Input field for city name
  locationBtn = inputPart.querySelector("button"), // Button to get device location
  weatherPart = wrapper.querySelector(".weather-part"), // Section to display weather information
  wIcon = weatherPart.querySelector("img"), // Image element for weather icon
  arrowBack = wrapper.querySelector("header i"); // Back arrow icon

const apiKey = "YOUR_API"; // Replace with your actual API key from OpenWeather
let api; // Variable to store the API URL

// Event listener for when a key is released on the input field
inputField.addEventListener("keyup", (e) => {
  // Checks if the 'Enter' key is pressed and the input field is not empty
  if (e.key == "Enter" && inputField.value != "") {
    requestApi(inputField.value); // Calls the function to request weather data for the entered city
  }
});

// Event listener for the location button click
locationBtn.addEventListener("click", () => {
  // Checks if the browser supports geolocation API
  if (navigator.geolocation) {
    // Gets the current position of the device
    navigator.geolocation.getCurrentPosition(onSuccess, onError);
  } else {
    alert("Your browser does not support geolocation API");
  }
});

// Function to build the API URL based on the city name and request weather data
function requestApi(city) {
  api = `https://api.openweathermap.org/data/2.5/weather?q=${city}&units=metric&appid=${apiKey}`;
  fetchData(); // Calls the function to fetch weather data
}

// Function to handle success in getting the device's geolocation
function onSuccess(position) {
  const { latitude, longitude } = position.coords; // Destructuring to get latitude and longitude
  api = `https://api.openweathermap.org/data/2.5/weather?lat=${latitude}&lon=${longitude}&units=metric&appid=${apiKey}`;
  fetchData(); // Calls the function to fetch weather data
}

// Function to handle errors in getting the device's geolocation
function onError(error) {
  infoTxt.innerText = error.message; // Displays the error message
  infoTxt.classList.add("error"); // Adds the "error" class to style the message as an error
}

// Function to fetch data from the OpenWeather API
function fetchData() {
  infoTxt.innerText = "Getting weather details..."; // Displays a pending message
  infoTxt.classList.add("pending"); // Adds the "pending" class to style the message
  fetch(api) // Makes an HTTP request to the API
    .then((res) => res.json()) // Converts the response to JSON
    .then((result) => weatherDetails(result)) // Passes the JSON data to the weatherDetails function
    .catch(() => {
      infoTxt.innerText = "Something went wrong, API Error"; // Displays an error message if the request fails
      infoTxt.classList.replace("pending", "error"); // Replaces "pending" class with "error" class
    });
}

// Function to display the weather details on the webpage
function weatherDetails(info) {
  if (info.cod == "404") { // Checks if the city was not found
    infoTxt.classList.replace("pending", "error"); // Replaces "pending" class with "error" class
    infoTxt.innerText = `${inputField.value} isn't a valid city name`; // Displays an error message for invalid city name
  } else {
    // Extracting weather and location information from the API response
    const city = info.name;
    const country = info.sys.country;
    const { description, id } = info.weather[0]; // Weather description and ID
    const { temp, feels_like, humidity } = info.main; // Temperature, feels-like temperature, and humidity

    // Setting the weather icon based on the weather ID
    if (id == 800) {
      wIcon.src = "http://codingstella.com/wp-content/uploads/2024/01/download-16.png";
    } else if (id >= 200 && id <= 232) {
      wIcon.src = "http://codingstella.com/wp-content/uploads/2024/01/download-17.png";
    } else if (id >= 600 && id <= 622) {
      wIcon.src = "http://codingstella.com/wp-content/uploads/2024/01/download-18.png";
    } else if (id >= 701 && id <= 781) {
      wIcon.src = "http://codingstella.com/wp-content/uploads/2024/01/download-19.png";
    } else if (id >= 801 && id <= 804) {
      wIcon.src = "http://codingstella.com/wp-content/uploads/2024/01/download-20.png";
    } else if ((id >= 500 && id <= 531) || (id >= 300 && id <= 321)) {
      wIcon.src = "http://codingstella.com/wp-content/uploads/2024/01/download-21.png";
    }

    // Displaying the weather details in the appropriate elements
    weatherPart.querySelector(".temp .numb").innerText = Math.floor(temp); // Temperature
    weatherPart.querySelector(".weather").innerText = description; // Weather description
    weatherPart.querySelector(".location span").innerText = `${city}, ${country}`; // City and country
    weatherPart.querySelector(".temp .numb-2").innerText = Math.floor(feels_like); // Feels-like temperature
    weatherPart.querySelector(".humidity span").innerText = `${humidity}%`; // Humidity percentage

    // Removing the error or pending message and resetting the input field
    infoTxt.classList.remove("pending", "error");
    infoTxt.innerText = "";
    inputField.value = ""; // Clearing the input field
    wrapper.classList.add("active"); // Adds the "active" class to the wrapper to show the weather details
  }
}

// Event listener for the back arrow click
arrowBack.addEventListener("click", () => {
  wrapper.classList.remove("active"); // Removes the "active" class to hide the weather details and go back to the input section
});

Conclusion

Congratulations! You’ve successfully built a functional weather app using HTML, CSS, and JavaScript. You can now enter a city name, search for its weather, and view the temperature, description, and icon. This project demonstrates the power of web development and how you can leverage APIs to create interactive and useful applications.

Creating a Functional Weather App with HTML, CSS, and JavaScript :From Scratch

Leave a Reply

Your email address will not be published. Required fields are marked *

Scroll to top