Coding classic

html, css, javascript, react, python

How to Create Custom File Upload Button in HTML CSS & JavaScript

Beyond the Default: Crafting Custom File Upload Buttons with HTML, CSS, and JavaScript

The default file upload button in HTML is often bland and uninspired, failing to match the aesthetic of modern web designs. But fear not! With a little HTML, CSS, and JavaScript magic, you can transform that boring button into a visually appealing and user-friendly element.

This article will guide you through the process of creating custom file upload buttons, enhancing both their appearance and functionality.

1. The Foundation: HTML Structure

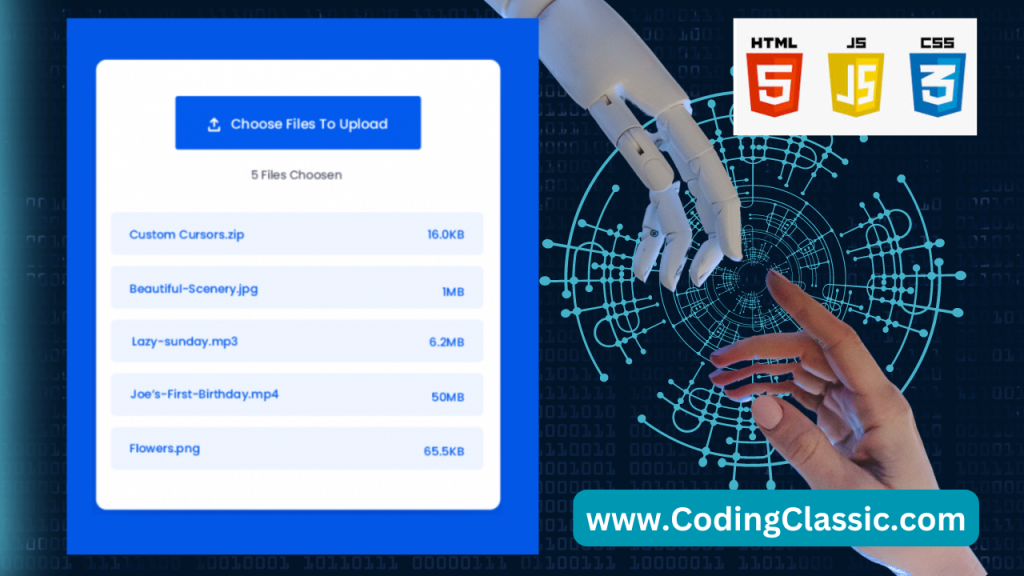
Start by creating a basic HTML structure for your custom button. This HTML code constructs a webpage featuring a customized file upload button. It leverages Font Awesome icons and Google Fonts for visual enhancements. The webpage’s central element is a container housing an input field for file selection, a custom button label, a display area for the number of selected files, and a list to showcase the chosen files.

<!DOCTYPE html>
<html lang="en">
  <head>
    <!-- Meta tag to set the viewport to scale properly on all devices -->
    <meta name="viewport" content="width=device-width, initial-scale=1.0" />
    <!-- Title of the webpage -->
    <title>Custom File Upload Button By Coding Classic</title>
    <!-- Linking Font Awesome Icons for using icons in the webpage -->
    <link
      rel="stylesheet"
      href="https://cdnjs.cloudflare.com/ajax/libs/font-awesome/6.2.0/css/all.min.css"
    />
    <!-- Linking Google Fonts to use the 'Poppins' font family for styling -->
    <link
      href="https://fonts.googleapis.com/css2?family=Poppins:wght@400;500&display=swap"
      rel="stylesheet"
    />
    <!-- Linking external CSS file for custom styles -->
    <link rel="stylesheet" href="style.css" />
  </head>
  <body>
    <!-- Main container holding the file input and display elements -->
    <div class="container">
      <!-- File input element allowing multiple file selections -->
      <input type="file" id="file-input" multiple />
      <!-- Label for the file input, styled as a custom button with an icon -->
      <label for="file-input">
        <i class="fa-solid fa-arrow-up-from-bracket"></i>
          Choose Files To Upload
      </label>
      <!-- Display area showing the number of files selected -->
      <div id="num-of-files">No Files Chosen</div>
      <!-- Unordered list for displaying the names of the selected files -->
      <ul id="files-list"></ul>
    </div>
    <!-- Linking external JavaScript file for handling file input functionality -->
    <script src="script.js"></script>
  </body>
</html>

2. Styling with CSS

This CSS defines the visual layout for the webpage. It configures the main container’s size, position, spacing, rounded corners, and shadow effect. The actual file input is concealed, while a label is formatted to serve as the visible upload button. Text showing the file count is given specific styling. The list of chosen files is customized with particular formatting and spacing between items.

* {
  padding: 0; /* Remove default padding for all elements */
  margin: 0; /* Remove default margin for all elements */
  box-sizing: border-box; /* Ensure padding and border are included in the element's total width and height */
  font-family: "Poppins", sans-serif; /* Apply the 'Poppins' font to all elements */
}

body {
  background-color: #025bee; /* Set the background color of the body to a blue shade */
}

.container {
  background-color: #ffffff; /* Set the background color of the container to white */
  width: 90%; /* Set the width of the container to 90% of the viewport width */
  max-width: 34.37em; /* Set a maximum width for the container */
  position: relative; /* Set the container's position as relative for potential positioning of child elements */
  margin: 3.12em auto; /* Center the container horizontally and add vertical margin */
  padding: 3.12em 1.25em; /* Add padding inside the container */
  border-radius: 0.43em; /* Round the corners of the container */
  box-shadow: 0 1.25em 2.18em rgb(1, 28, 71, 0.3); /* Add a shadow to the container for a 3D effect */
}

input[type="file"] {
  display: none; /* Hide the default file input element */
}

label {
  display: block; /* Make the label a block element */
  position: relative; /* Set the label's position as relative for potential positioning */
  background-color: #025bee; /* Set the background color of the label to match the body's background */
  color: #ffffff; /* Set the text color of the label to white */
  font-size: 1.12em; /* Set the font size of the label */
  font-weight: 500; /* Set the font weight of the label */
  text-align: center; /* Center the text inside the label */
  width: 18.75em; /* Set the width of the label */
  padding: 1.12em 0; /* Add vertical padding inside the label */
  margin: auto; /* Center the label horizontally */
  border-radius: 0.31em; /* Round the corners of the label */
  cursor: pointer; /* Change the cursor to a pointer when hovering over the label */
}

#num-of-files {
  font-weight: 400; /* Set the font weight to normal */
  text-align: center; /* Center the text inside the element */
  margin: 1.25em 0 1.87em 0; /* Add vertical margin to the element */
}

ul {
  list-style-type: none; /* Remove the default list styling (bullets) */
}

.container li {
  font-weight: 500; /* Set the font weight of list items to medium */
  background-color: #eff5ff; /* Set the background color of list items to a light blue shade */
  color: #025bee; /* Set the text color of list items to blue */
  margin-bottom: 1em; /* Add margin below each list item */
  padding: 1.1em 1em; /* Add padding inside each list item */
  border-radius: 0.3em; /* Round the corners of each list item */
  display: flex; /* Use flexbox layout for list items */
  justify-content: space-between; /* Distribute space evenly between the children of list items */
}

3. JavaScript for Functionality

This JavaScript enhances the file input’s behavior. Upon file selection, it updates the interface to display the total count of chosen files. It also generates a list showing each selected file’s name and size. For files 1MB or larger, the size is presented in megabytes rather than kilobytes.

let fileInput = document.getElementById("file-input"); 
// Get the file input element by its ID and assign it to the variable fileInput

let fileList = document.getElementById("files-list");
// Get the unordered list (ul) element by its ID where the selected files will be listed and assign it to the variable fileList

let numOfFiles = document.getElementById("num-of-files");
// Get the element that displays the number of selected files by its ID and assign it to the variable numOfFiles

fileInput.addEventListener("change", () => { 
  // Add an event listener to the file input element that listens for changes (i.e., when files are selected)

  fileList.innerHTML = ""; 
  // Clear any previous list items inside the fileList element (to refresh the list with the new selection)

  numOfFiles.textContent = `${fileInput.files.length} Files Selected`; 
  // Update the text content of the numOfFiles element to display the number of files selected

  for (i of fileInput.files) { 
    // Loop through each selected file using a for-of loop

    let reader = new FileReader(); 
    // Create a new instance of FileReader (used for reading file contents, though it's not actually utilized in this snippet)

    let listItem = document.createElement("li"); 
    // Create a new list item (li) element for each file

    let fileName = i.name; 
    // Get the name of the current file and store it in the fileName variable

    let fileSize = (i.size / 1024).toFixed(1); 
    // Calculate the size of the current file in kilobytes (KB) and round it to one decimal place

    listItem.innerHTML = `<p>${fileName}</p><p>${fileSize}KB</p>`; 
    // Set the inner HTML of the list item to display the file name and size in KB

    if (fileSize >= 1024) { 
      // If the file size is 1024 KB or more (i.e., 1 MB or larger), convert the size to megabytes (MB)

      fileSize = (fileSize / 1024).toFixed(1); 
      // Recalculate the size in megabytes and round it to one decimal place

      listItem.innerHTML = `<p>${fileName}</p><p>${fileSize}MB</p>`; 
      // Update the inner HTML of the list item to display the file name and size in MB
    }

    fileList.appendChild(listItem); 
    // Append the newly created list item to the fileList element, adding it to the displayed list of files
  }
});

Conclusion

By combining HTML, CSS, and JavaScript, you can create custom file upload buttons that are both aesthetically pleasing and user-friendly. This allows you to enhance the user experience and seamlessly integrate file upload functionality into your web applications. Remember to experiment with different styles and functionalities to create buttons that perfectly match your website’s design and user needs.

How to Create Custom File Upload Button in HTML CSS & JavaScript

Leave a Reply

Your email address will not be published. Required fields are marked *

Scroll to top